Contact Form in HTML and CSS (With Validation)
A responsive, accessible contact form with clear inline errors, plus the two real ways to deliver the message to your inbox.
A contact form is an HTML <form> with labelled name, email, subject and message fields. HTML attributes such as required, type="email" and minlength define the rules, CSS styles the fields and error states, and a short script shows a friendly message under each field. HTML and CSS cannot send email on their own, so the form must post to a server or a form service. The complete code and both ways to send it are below.
A contact form is on almost every website, and it is where many visitors decide whether to get in touch or give up. A good one is easy to fill in on a phone, tells people clearly what went wrong, and actually delivers the message.
In this tutorial you will build a responsive, accessible contact form with inline validation. You will also learn the part most tutorials leave out: how the message really gets from the browser to your inbox. Paste each block into the matching tab of the HixCode online code editor to try it.
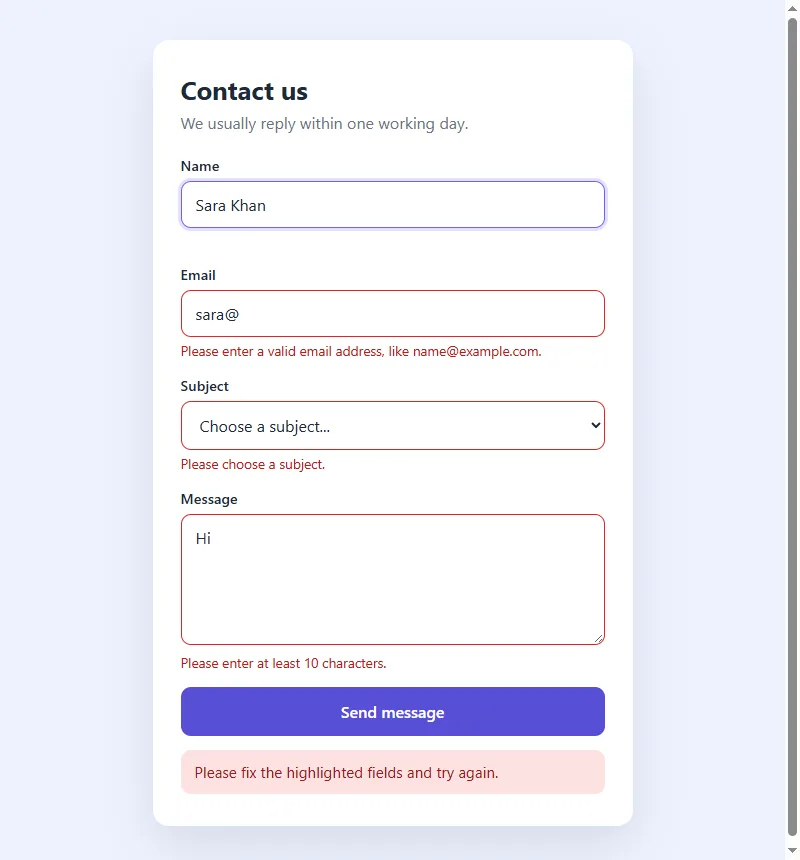
Step 1: The HTML
<main class="page">
  <form class="contact-form" id="contactForm" novalidate>
    <h1>Contact us</h1>
    <p class="intro">We usually reply within one working day.</p>

    <div class="field">
      <label for="name">Name</label>
      <input type="text" id="name" name="name" autocomplete="name"
             minlength="2" required aria-describedby="name-error">
      <p class="error" id="name-error"></p>
    </div>

    <div class="field">
      <label for="email">Email</label>
      <input type="email" id="email" name="email" autocomplete="email"
             required aria-describedby="email-error">
      <p class="error" id="email-error"></p>
    </div>

    <div class="field">
      <label for="subject">Subject</label>
      <select id="subject" name="subject" required aria-describedby="subject-error">
        <option value="">Choose a subject...</option>
        <option>General question</option>
        <option>Project enquiry</option>
        <option>Support</option>
      </select>
      <p class="error" id="subject-error"></p>
    </div>

    <div class="field">
      <label for="message">Message</label>
      <textarea id="message" name="message" rows="5"
                minlength="10" maxlength="1000" required
                aria-describedby="message-error"></textarea>
      <p class="error" id="message-error"></p>
    </div>

    <button type="submit" id="submitButton">Send message</button>

    <p class="form-status" id="formStatus" role="status"></p>
  </form>
</main>
What each part does
- A
<label>for every field, connected by matchingforandidvalues. Screen readers read the label, and tapping it focuses the field, which makes a bigger target on phones. nameattributes. When a form is sent, each value is labelled with the field’sname. A field without one is not sent at all. This is the most common reason for “my form sends empty emails”.- The right input types.
type="email"shows a keyboard with the @ key on phones and checks the format. A<select>gives a fixed list of subjects. autocompletelets the browser fill in the name and email, so visitors type less.- Validation attributes.
required,minlengthandmaxlengthare the rules. The browser checks them for you. - An error paragraph for each field, linked with
aria-describedby, so a screen reader reads the error together with the field. novalidateon the form turns off the browser’s own pop-up bubbles, which look different in every browser and vanish after a few seconds. The rules still apply. We simply show the messages ourselves.
Step 2: The CSS
* {
  box-sizing: border-box;
  margin: 0;
  padding: 0;
}

body {
  font-family: system-ui, -apple-system, "Segoe UI", Roboto, sans-serif;
  color: #1f2937;
}

.page {
  min-height: 100vh;
  display: flex;
  justify-content: center;
  align-items: flex-start;
  padding: 40px 16px;
  background: #eef2ff;
}

.contact-form {
  width: 100%;
  max-width: 480px;
  padding: 32px 28px;
  background: #fff;
  border-radius: 16px;
  box-shadow: 0 20px 50px rgba(31, 41, 55, 0.12);
}

.contact-form h1 {
  font-size: 1.6rem;
}

.intro {
  margin: 6px 0 22px;
  color: #6b7280;
}

.field {
  margin-bottom: 16px;
}

.field label {
  display: block;
  margin-bottom: 6px;
  font-size: 0.9rem;
  font-weight: 600;
}

.field input,
.field select,
.field textarea {
  width: 100%;
  padding: 12px 14px;
  border: 1px solid #d1d5db;
  border-radius: 10px;
  background: #fff;
  font-size: 1rem;
  font-family: inherit;
  color: inherit;
}

.field textarea {
  resize: vertical;
}

.field input:focus,
.field select:focus,
.field textarea:focus {
  outline: none;
  border-color: #6c63ff;
  box-shadow: 0 0 0 3px rgba(108, 99, 255, 0.2);
}

/* Fields the script has marked as invalid */
.field [aria-invalid="true"] {
  border-color: #dc2626;
}

.field [aria-invalid="true"]:focus {
  box-shadow: 0 0 0 3px rgba(220, 38, 38, 0.18);
}

.error {
  min-height: 1.2em;
  margin-top: 4px;
  color: #b91c1c;
  font-size: 0.85rem;
}

button[type="submit"] {
  width: 100%;
  padding: 14px;
  border: 0;
  border-radius: 10px;
  background: #6c63ff;
  color: #fff;
  font-size: 1rem;
  font-weight: 600;
  font-family: inherit;
  cursor: pointer;
}

button[type="submit"]:hover {
  background: #574fd6;
}

button[type="submit"]:disabled {
  opacity: 0.7;
  cursor: not-allowed;
}

.form-status {
  margin-top: 14px;
  padding: 12px 14px;
  border-radius: 10px;
  font-size: 0.95rem;
}

.form-status:empty {
  display: none;
}

.form-status.success {
  background: #dcfce7;
  color: #166534;
}

.form-status.error {
  background: #fee2e2;
  color: #991b1b;
}

.form-status.info {
  background: #e0e7ff;
  color: #3730a3;
}- Full-width fields.
width: 100%withbox-sizing: border-boxmeans padding is included in the width, so fields never overflow the card. The card itself usesmax-width: 480px, so it shrinks on small screens with no media query. font-size: 1remon the fields. iPhones zoom the page when you tap a field with text smaller than 16 pixels. Keeping it at 1rem prevents that jump.font-family: inherit. Inputs, selects and textareas do not use the page font by default. This makes them match.- Error styling from
[aria-invalid="true"]. The script sets this attribute, and the CSS turns the border red. One attribute informs screen readers and drives the design. min-heighton.errorreserves a line for the message, so the form does not jump when an error appears.- Visible focus. The default outline is replaced by a colored border and a soft ring. Never remove focus styles without adding your own.
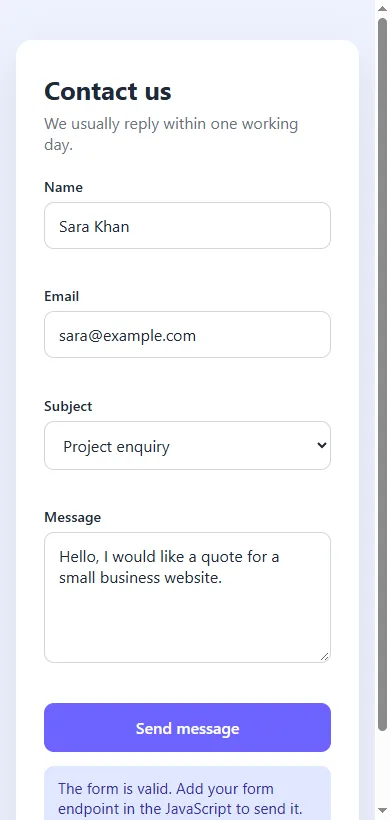
Step 3: Validation with JavaScript
const form = document.getElementById("contactForm");
const submitButton = document.getElementById("submitButton");
const formStatus = document.getElementById("formStatus");
const fields = Array.from(form.querySelectorAll("input, select, textarea"));

// Paste the URL of your form backend here (see "How to actually send the form")
const FORM_ENDPOINT = "";

// Turn the browser's validity checks into friendly messages
function getErrorMessage(field) {
  const validity = field.validity;
  if (validity.valueMissing) {
    return field.tagName === "SELECT" ? "Please choose a subject." : "This field is required.";
  }
  if (validity.typeMismatch) return "Please enter a valid email address, like name@example.com.";
  if (validity.tooShort) return "Please enter at least " + field.minLength + " characters.";
  if (validity.tooLong) return "Please keep this under " + field.maxLength + " characters.";
  return "";
}

// Show or clear the message under one field. Returns true when it is valid.
function validateField(field) {
  const message = getErrorMessage(field);
  document.getElementById(field.id + "-error").textContent = message;
  field.setAttribute("aria-invalid", message === "" ? "false" : "true");
  return message === "";
}

function setStatus(text, type) {
  formStatus.textContent = text;
  formStatus.className = "form-status " + type;
}

fields.forEach(function (field) {
  // Check a field when the user leaves it...
  field.addEventListener("blur", function () {
    validateField(field);
  });
  // ...and clear the error as soon as they fix it
  field.addEventListener("input", function () {
    if (field.getAttribute("aria-invalid") === "true") validateField(field);
  });
});

form.addEventListener("submit", async function (event) {
  event.preventDefault();

  const invalidFields = fields.filter(function (field) {
    return !validateField(field);
  });

  if (invalidFields.length > 0) {
    setStatus("Please fix the highlighted fields and try again.", "error");
    invalidFields[0].focus();
    return;
  }

  if (FORM_ENDPOINT === "") {
    setStatus("The form is valid. Add your form endpoint in the JavaScript to send it.", "info");
    return;
  }

  submitButton.disabled = true;
  submitButton.textContent = "Sending...";

  try {
    const response = await fetch(FORM_ENDPOINT, {
      method: "POST",
      headers: { Accept: "application/json" },
      body: new FormData(form)
    });
    if (!response.ok) throw new Error("Request failed: " + response.status);

    form.reset();
    setStatus("Thank you! Your message has been sent.", "success");
  } catch (error) {
    setStatus("Sorry, your message could not be sent. Please try again.", "error");
  } finally {
    submitButton.disabled = false;
    submitButton.textContent = "Send message";
  }
});
The Constraint Validation API
You do not need to write your own email pattern or length checks. Every form field has a validity object that the browser fills in from your HTML attributes. The script only reads it:
| Property | True when | Set by |
|---|---|---|
valueMissing | A required field is empty | required |
typeMismatch | The text is not a valid email address | type="email" |
tooShort | Fewer characters than allowed | minlength |
tooLong | More characters than allowed | maxlength |
getErrorMessage turns whichever one is true into a sentence a person can act on. Because the rules live in the HTML, changing minlength from 10 to 20 updates both the check and the message, with no JavaScript changes.
When the messages appear
- On blur, when the visitor leaves a field. Checking while they are still typing their email would show “invalid” after the first letter, which is annoying.
- On input, but only for a field already marked invalid, so the error disappears the moment it is fixed.
- On submit, every field is checked, and focus moves to the first one with a problem, so nobody has to hunt for it.
What happens when the form is valid
The script sends the fields with fetch to the address in FORM_ENDPOINT. While it waits, the button is disabled and reads “Sending...”, which stops double submissions. The success message is shown only after the server confirms it received the data. If the request fails, the visitor is told, and what they typed stays in the form.
FORM_ENDPOINT is empty in the example, because the address depends on where you send your form. Until you fill it in, the script says so honestly instead of pretending the message was sent. The next section explains what to put there.
Paste the three blocks into the editor, submit the empty form, then fix each field and watch the errors clear.
Open the Code Editor →How to actually send the form
This is the part to understand before you publish. HTML, CSS and JavaScript run in the visitor’s browser, and a browser cannot send an email by itself. Something on the internet has to receive the form data and pass it on. You have two choices.
Option 1: A form backend service
Form services such as Formspree, Web3Forms, Basin and Netlify Forms give you a URL. Your form posts to that URL, and the service emails you each submission. Most have a free plan, and none requires you to write server code. This is the quickest route for a portfolio or a small business site.
- Create an account with a form service and add a new form.
- Copy the endpoint URL it gives you.
- Paste it between the quotes of
FORM_ENDPOINTin the JavaScript. - Send a test message and check that it arrives.
Each service has slightly different requirements, for example an access key in a hidden field, so follow its setup page. It is also good practice to put the same URL in the form’s action attribute:
<form action="https://example.com/your-form-endpoint" method="POST">
  ...
</form>
Then the form still sends, as a normal page submission, for the few visitors whose browser has JavaScript turned off.
Option 2: Your own server
If your site has a back end (PHP, Node.js, Python and so on), create a route that receives the POST request and point FORM_ENDPOINT at it. That route must:
- Validate everything again. Browser validation is a convenience for honest visitors. Anyone can skip it and post straight to your server.
- Send the email through a mail service using SMTP or an email API, and keep the password or API key on the server, never in front-end JavaScript.
- Limit how often one visitor can submit, so the form cannot be used to flood your inbox.
- Never place user text into email headers without cleaning it, and send from your own address with the visitor’s address as the reply-to.
What about a mailto link?
Setting the form’s action to mailto:you@example.com does not send anything. It tries to open the visitor’s email app, which many people do not have set up, and it exposes your address to spam bots. Avoid it for forms. A plain email link beside the form is fine as an alternative way to reach you.
Stopping spam
Any public form will be found by bots. A simple first defence is a honeypot: an extra field that people cannot see but bots fill in. Add it inside the form:
<!-- Real people never see or fill this field. Bots usually do. -->
<div class="visually-hidden" aria-hidden="true">
  <label for="website">Leave this field empty</label>
  <input type="text" id="website" name="website" tabindex="-1" autocomplete="off">
</div>
Hide it with a visually-hidden class (not type="hidden", which bots skip), and have your server or form service discard any submission where that field is not empty. Most form services support a honeypot field by name. If spam still gets through, add a CAPTCHA service, which most form backends also offer.
Accessibility checklist
- Every field has a visible label. Placeholders are not labels: they vanish when you type.
- Errors are text, not only a red border, so they work for people who cannot see color differences.
- Error messages say how to fix the problem, not just “Invalid”.
- Each error is linked to its field with
aria-describedby, and invalid fields havearia-invalid. - The result message uses
role="status", so it is announced without moving focus. - The whole form can be completed with the keyboard alone. Test it with the Tab key.
Common mistakes to avoid
- Fields without a
name, so nothing is sent. - Showing “Message sent!” before the server has answered, or without sending anything at all.
- Clearing the form when sending fails, which makes people type everything again.
- Relying on JavaScript validation only, with no checks on the server.
- Asking for too much. Every extra field lowers the number of people who finish. Name, email and message are usually enough.
- Putting an email password or API secret in the page’s JavaScript, where anyone can read it.
Summary
You built a contact form with semantic HTML, responsive CSS, and validation that uses the browser’s own rules to show clear messages. You also know how it really gets delivered: through a form service or your own server, with validation repeated on the server and a honeypot against spam.
The same techniques apply to any form. Compare them with the login page in HTML and CSS, or add this form as the contact section of your portfolio website.
Frequently asked questions
Can an HTML contact form send email without a server?
No. HTML, CSS and JavaScript in the browser cannot send email by themselves. The form has to post its data to something that can: either a form backend service that gives you an endpoint URL, or your own server code.
How do I validate a form in HTML?
Add validation attributes to the fields: required for mandatory fields, type="email" for email format, and minlength or maxlength for length. The browser checks these rules, and JavaScript can read the result from each field's validity object to show custom messages.
How do I show custom error messages in a form?
Add novalidate to the form to turn off the browser's default bubbles, then on blur and on submit read field.validity (valueMissing, typeMismatch, tooShort) and write your own message into an element under the field. Link that element to the field with aria-describedby.
Is JavaScript validation enough for a contact form?
No. Client-side validation only improves the experience for visitors. Anyone can bypass it and post directly to your endpoint, so the server or form service must validate the data again.
How do I stop spam from my contact form?
Start with a honeypot: a field hidden from people that bots fill in, and reject submissions where it is not empty. Add rate limiting on the server, and a CAPTCHA if spam continues. Most form backend services include these protections.